


Teetorials: Simple Animated Gifs
by jesshanebury / None /

Teetorials are tips and tricks for adding those special touches to your designs. They're brought to you by our very own Threadless staff designers, Alex, Jillian & Speedy Joe. Check out Jillian's Teetorial on creating GIFs in Photoshop.
Animated GIFs! If you have a video you want to turn into a simple gif, there are plenty of links online to upload and generate a GIF pretty quickly. However, if you’re the doodlin’ type and want to make your own gif, here’s how to do it in Photoshop.
Threadless Teetorial - Animated Gif from Threadless.com on Vimeo
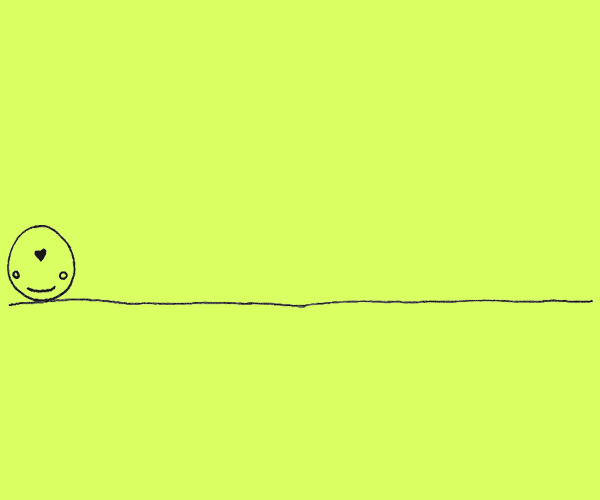
1) Have your files and layers prepared. I drew/assembled each frame like I would a flipbook and prepared them on separate (transparent) layers. The bottom layer, which won’t change, is just that green background.
I’ve arranged my layers in the order that I need them (when I want to turn them on and off). You don’t have to do that but you’re going to be hella confused if you don’t.
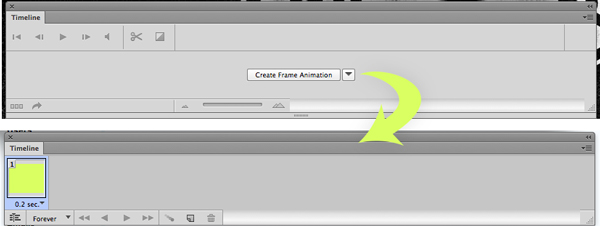
2) Go to Window > Timeline. Click “Create Frame Animation”.
 3) Turn on the first layer you want to see. As I mentioned before, I am leaving the green layer at the bottom ON throughout so that you always see it. The transparent layers on top of it are going to toggle on/off.
4) Create a new timeline frame by clicking that little paper icon. This icon duplicates your previous layer, which is why you will want to turn that layer off in the next step.
5) Turn off the layer you want to hide, and turn on the next one. Easy.
6) Create another new timeline frame, hide that previous layer that duplicated and turn on the next one that you want to see.
7) Keep doing that with all of the layers until you’ve reached the end of your timeline.
8) PRESS PLAY and check it out.
3) Turn on the first layer you want to see. As I mentioned before, I am leaving the green layer at the bottom ON throughout so that you always see it. The transparent layers on top of it are going to toggle on/off.
4) Create a new timeline frame by clicking that little paper icon. This icon duplicates your previous layer, which is why you will want to turn that layer off in the next step.
5) Turn off the layer you want to hide, and turn on the next one. Easy.
6) Create another new timeline frame, hide that previous layer that duplicated and turn on the next one that you want to see.
7) Keep doing that with all of the layers until you’ve reached the end of your timeline.
8) PRESS PLAY and check it out.
There are a number of extra things you can control in the Timeline panel, like frame delay (speed) and looping.
If you want it to loop forever and ever, change the looping setting from “Once” to “Forever”.
You can edit the delay of each individual frame by clicking on the number at the bottom of it (choose an option or enter your own), or select all of the frames at once (like I did in the video) and edit all of them. I have mine set to a .2 second delay. Keep hitting play/stop until you’re like, "AWE, YEA THIS LOOKS GOOOOOOD."
9) Once you’re happy with everything, go to File > Save for Web and save as a GIF.
10) Post it in the comments section.
merkinspurlock
TheInfamousBaka
JaymeArt
YaaH
Manupix
nikoby
Christina.A.art
ValerieStrecker
SteveOramA
MadKobra
NDTank
AnthonyMoore